NOTE for anybody not presently passing Grade 9 Science.
There is an assignment (two options; you can choose) that you can complete by June 15, 2020.
To download the assignment, click here.
To upload your completed assignment, click here.
There is an assignment (two options; you can choose) that you can complete by June 15, 2020.
To download the assignment, click here.
To upload your completed assignment, click here.
Week 11: June 15-19 -- our Final Week
Welcome to Forensic Sciences Week!
This week we will explore some interesting scientific phenomenon related to the study of forensics. But what is Forensic Science?
This week at home you will explore fingerprinting, blood spatter, and handwriting analysis at home with different activities. We'll also do some interesting interactives in class on Wednesday and Friday at 10am as usual.
Zoom Links: Wednesday and Friday
Check out the information below from the Canadian Society for Forensic Science.
Here’s the scoop on real Forensic Science!
Many of us are interested in the exciting and developing field of forensic science. This is, in part, due to the sensationalized television shows which feature forensic science and crime scene investigation. Such shows are intended as entertainment only and are not designed to educate the public about the science itself or the genuine careers available in the field. However, whether accurate or not, many of us derive a great deal of information and ‘common knowledge’ from television and it is clear from discussions with people of all ages that there are a number of misconceptions surrounding the field of forensic science.
So what is forensic science?
Derived from the Latin term forensis which means a public debate or discussion, forensics in the modern sense implies courts of law. Forensic Science is therefore the application of science, and the scientific method to the judicial system. The important word here is science. A forensic scientist will not only be analysing and interpreting evidence but also challenged in court while providing expert witness testimony.
Forensic science (often shortened to forensics) is used to enforce laws and government regulations and statutes, to resolve disputes, to assess blame and establish responsibility, and to improve public safety. Because science is now used routinely in litigation, various groups, including lawyers, judges, enforcement officials, and the public, need to know what forensic science can and cannot do.
Forensic scientists use cutting-edge scientific techniques to examine and interpret evidence in connection with civil and criminal proceedings. In criminal law, forensics science can help prove the guilt or innocence of the defendant. In civil actions, forensics can help resolve a broad spectrum of legal issues through the identification, analysis and evaluation of physical evidence.
Forensic science draws upon a variety of scientific disciplines, including biology, physics and chemistry.
The field of forensic science covers:
Document examination
DNA analysis
Electronic/digital media
Fingerprinting
Autopsy techniques
Engineering
Linguistics
Anthropology
Pathology
Economics
Accounting
Entomology
Toxicology
The traditional disciplines of forensic science include:
Toxicology (study of alcohol and drugs)
Serology (study of blood and other biological fluids)
Questioned document examination (examination of documents, handwriting comparison, study of inks, typewriter imprints, counterfeiting etc.)
Chemistry
Firearms identification and ballistics (study of marks and striations on bullets)
Hair and fibre analysis
Pathology
Odontology (study of bite marks, teeth structure)
Anthropology and the determination of a biological profile
For more information, also check out this amazing website called Forensic Science Simplified.
Watch the video below on the left to understand how a forensic investigation might work. The one on the right (sorry about the advertising) there are some new techniques.
|
|
|
Activity 1: Fingerprint Testing at Home
Background about Lifting Fingerprints
Latent prints: Latent prints are finger prints that have been left behind on any surface. They may be visible (from dirty or dusty hands) or invisible. They are made up of oils, salts and amino acids that are secreted from your skin.
Methods of “lifting” latent prints:
Dusting *works best on smooth surfaces like glass, plastic, door knobs etc.
*the colour and texture of the powder is chosen to contrast the surface
Silver nitrate * works best on wood surfaces
*can be used to find prints on wood that are very old
* silver nitrate reacts with the salts that are left behind, then UV light turns the invisible salts a dark brown/black colour
Iodine chamber *works best on paper
*can find very old prints
* turns the oils from your prints a dark yellow or brown colour
Super glue * great for garbage bags, insides of gloves and textured (bumpy) surfaces
* the object is placed in a closed chamber, the glue is heated and the fumes “stick” to the print
Ninhydrin * chemical that reacts with amino acids left when your finger touches something
* can pick up prints 30 years after they were left behind!!!
*turns the prints bright purple.
In this activity you will lift fingerprints at home!
Purpose: This activity will allow you to play the part of a crime scene investigator by teaching you how to find latent prints on a smooth surface using dusting techniques.
Materials: Any object with a smooth surface but preferably dark in colour
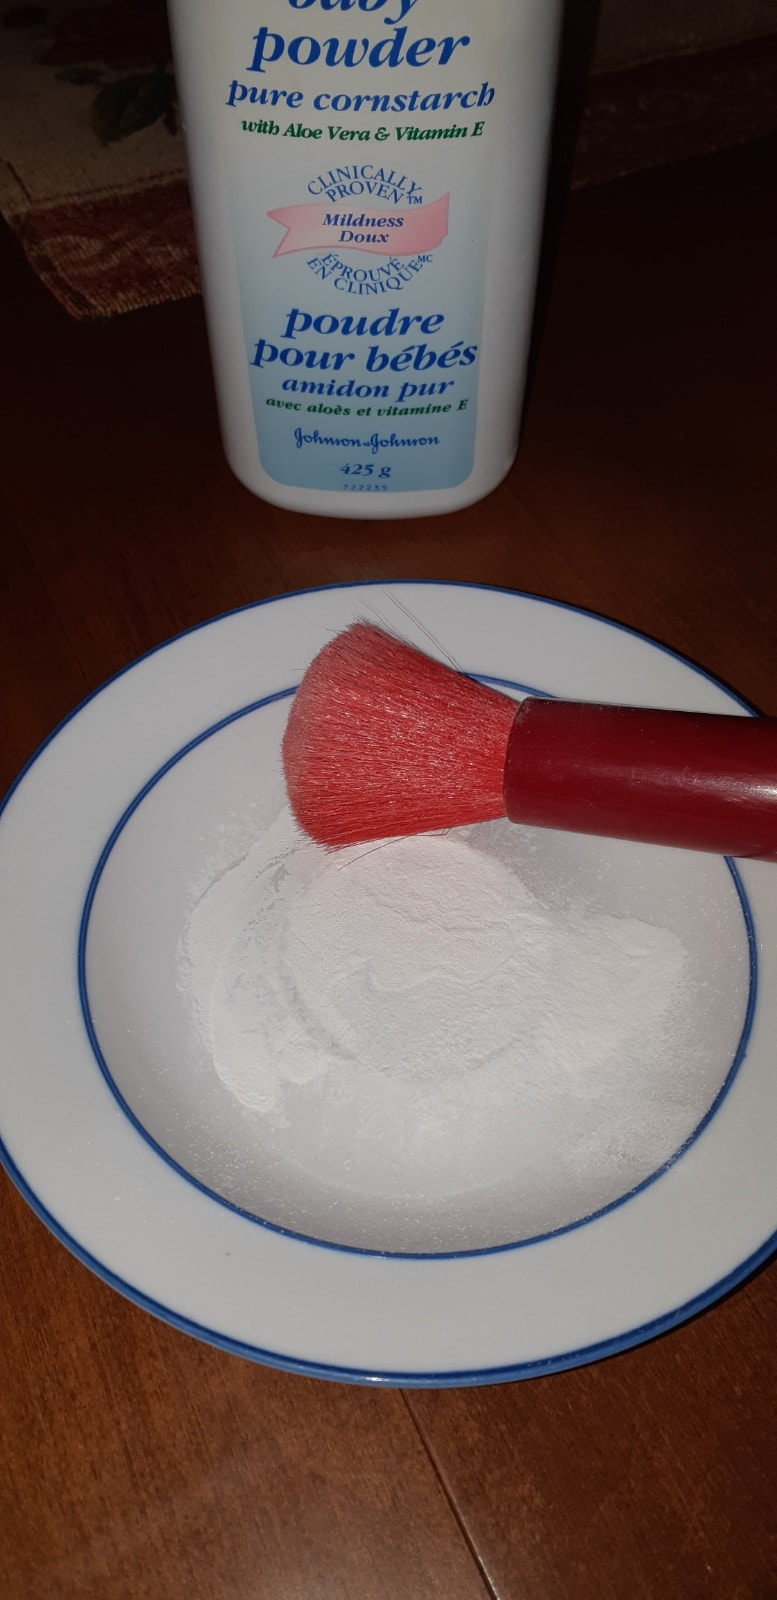
Soft make up brush
Baby powder (though any fine powder could work like flour)
Tape and dark paper (optional if no dark colour surface available
Procedure:
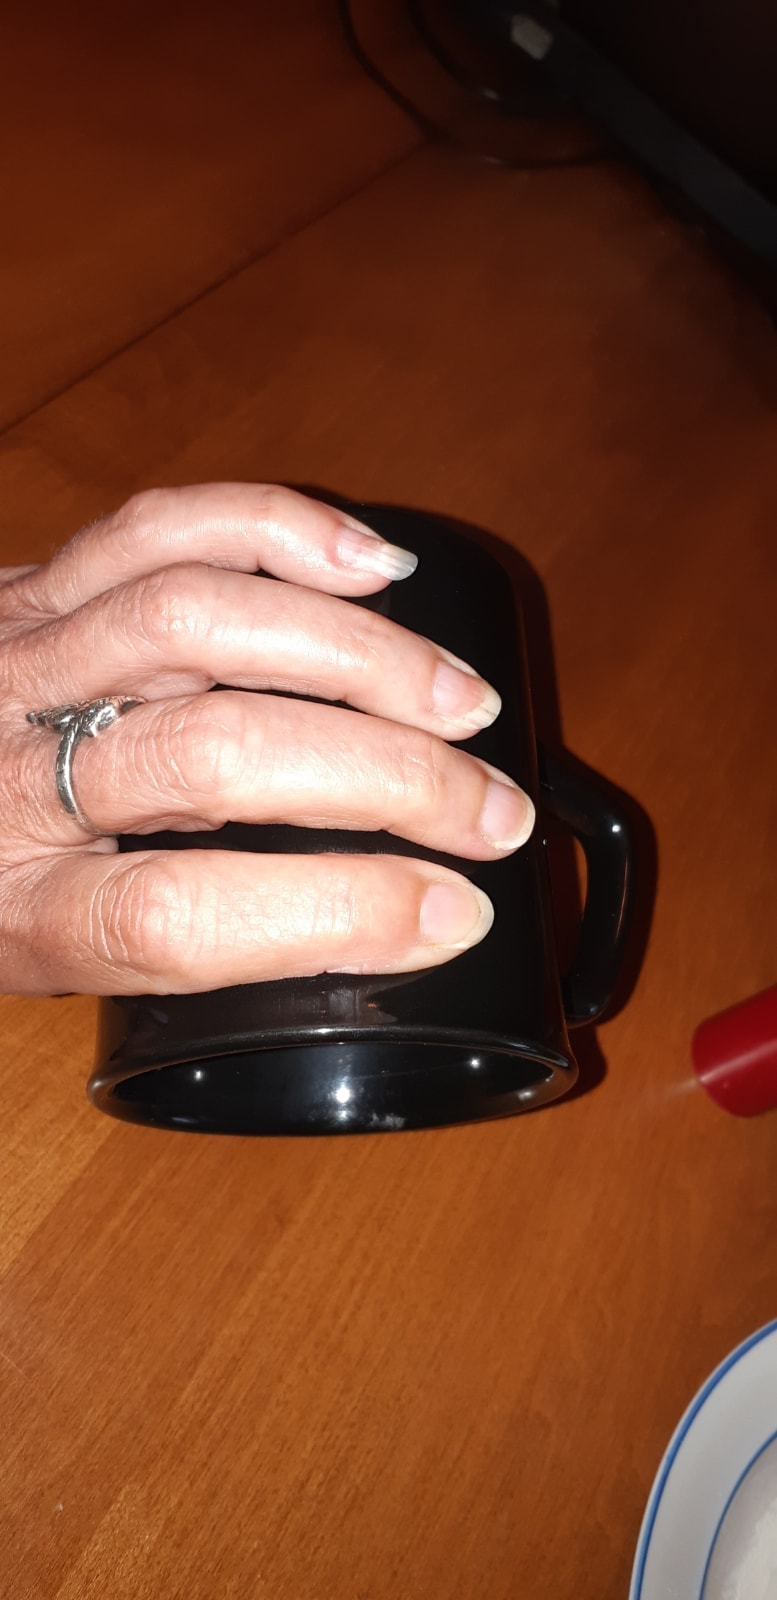
- Rub your fingers on the back of your neck and up into your hairline (great place to get natural oils).
- Grab your smooth object or press your fingers against it to leave a print.
- Place some powder on a plate and lightly dip the brush into the powder.
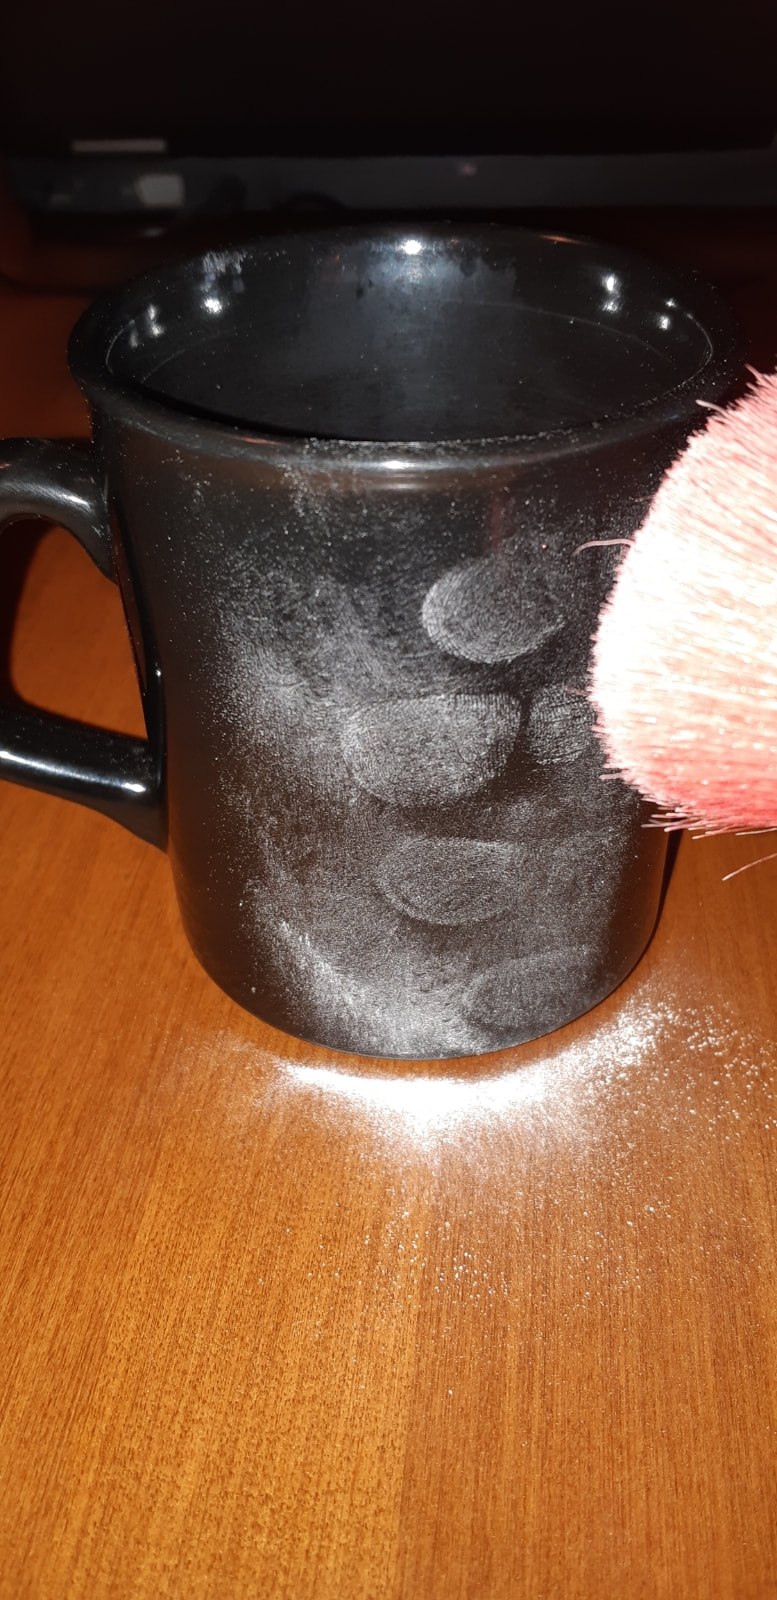
- Use the brush to gently apply the powder to the surface. The key here is that you want to spread the powder on a nice even layer, dabbing and lightly turning. Use a light touch so you don’t smear the print.
- Observe your print with a magnifying glass or your cell phone camera.
- If you dusted for prints on a light coloured surface, use a piece of tape to ‘lift’ the print and put the tape on a dark paper to see the contrast.
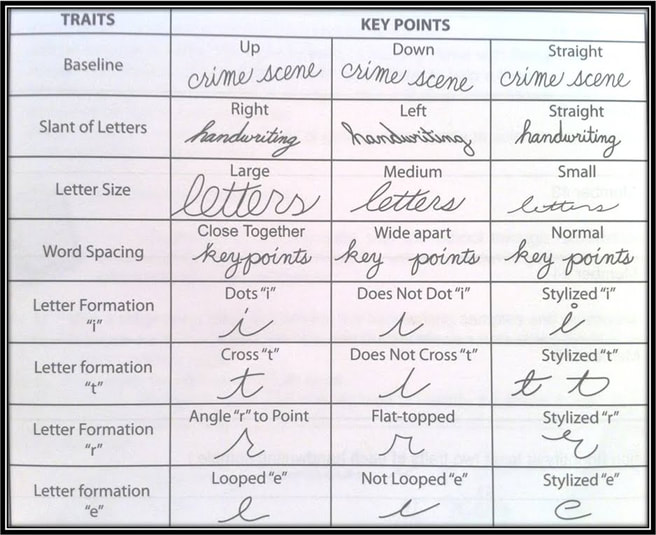
Handwriting Analysis
Source: Crimemuseum.org
Handwriting analysis falls into the questioned documents section of forensic science. These documents are examined by expert questioned documents examiners or QDEs. QDEs look for forgeries and alterations and make comparisons if there is an original sample of handwriting available.
Handwriting is an individual characteristic. This means that handwriting is unique for each person. Each person has their own style. Handwriting analysts say that people could have a few writing characteristics that are the same but the likelihood of having any more than that is impossible. The similarity in handwriting would be due to the style characteristics that we were taught when we were learning handwriting in school out of a book. Thus, handwriting is as unique as a fingerprint.
Handwriting analysis is looking for small differences between the writing of a sample where the writer is known and a writing sample where the writer is unknown. Instead of beginning to look for similarities in the handwriting a QDE begins to search for differences since it’s the differences that determine if the document is a forgery. A QDE is looking at three things: letter form, line form and formatting.
•Letter form– This includes curves, slants, the proportional size of letters (relationship between size of short and tall letters and between the height and width of a single letter), the slope of writing and the use and appearance of connecting lines (links) between letters. A person may form a letter differently depending on where the letter falls in a word – beginning, middle or end. So an analyst will try to find examples of each letter in each placement.
•Line form– This includes how smooth and dark the lines are, which indicates how much pressure the writer applies while writing and the speed of the writing.
•Formatting– This includes the spacing between letters, the spacing between words, the placement of words on a line and the margins a writer leaves empty on a page. It also considers spacing between lines — in other words, do strokes from words on one line intersect with strokes in words on the line below and above it?
Content, such as grammar, spelling, phrasing and punctuation should also be looked at.
A problem that arises during handwriting analysis is simulation, which is the attempt to disguise one’s handwriting or the attempt to copy another’s. Simulation is a huge problem because it can make it much harder to make a determination about a questioned document or it can make it impossible. It can be possible to determine simulation though. The following factors are to be looked at:
• Shaky lines
• Dark and thick starts and finishes for words
• A lot of pen lifts
All of these factors are present when someone is forming letters slowly and carefully instead of naturally which is done quickly and without a second thought. Simulation is only one factor that could lead to a handwriting analysis being inaccurate. Some other factors include drugs, exhaustion and illness. Other factors are made by human error, like comparing uppercase and lowercase letters or by not having good exemplar (sample from the suspect).
Activity 2: Handwriting Analysis
Materials:
Documents to be examined
Ruler
Protractor (optional)
Magnifying lenses
Tips
- Examine the spacing between letters and words. Use a ruler to measure typical spacing.
- Examine the relative height, width, and size of letters. Use a ruler to measure these for
comparison.
- Examine pen lifts and separations. Some letters and combinations will be continuous while
others may not be connected. Look at the beginning and ending strokes of words and letters
and any connecting strokes.
- Are there any unusual letter formations such as loops and curls or a mixture of cursive and
printing of letters?
- Is there any shading of letters due to uneven pressure applied in writing?
- Examine the slant of the letters. Do they slant left, right, or not at all? Are the slants
consistent throughout the writing sample? Measure the angles of slant using a protractor.
- Examine the baseline habits. Are the words and letters on the baseline or are they above and
below. A ruler will be helpful in determining this.
- Look for flourishes and embellishments. Using small circles to dot i’s or for periods, loops on
capital letters or ending letters, etc. Are there any unusual letter formations?
- Look at the placement of diacritics. Are the i’s dotted and t’s crossed? Individuals tend to
dot i’s and cross t’s in unique fashions.
- Study the ransom note in Figure H-1. Note some of the unique characteristics of the
individual’s handwriting.
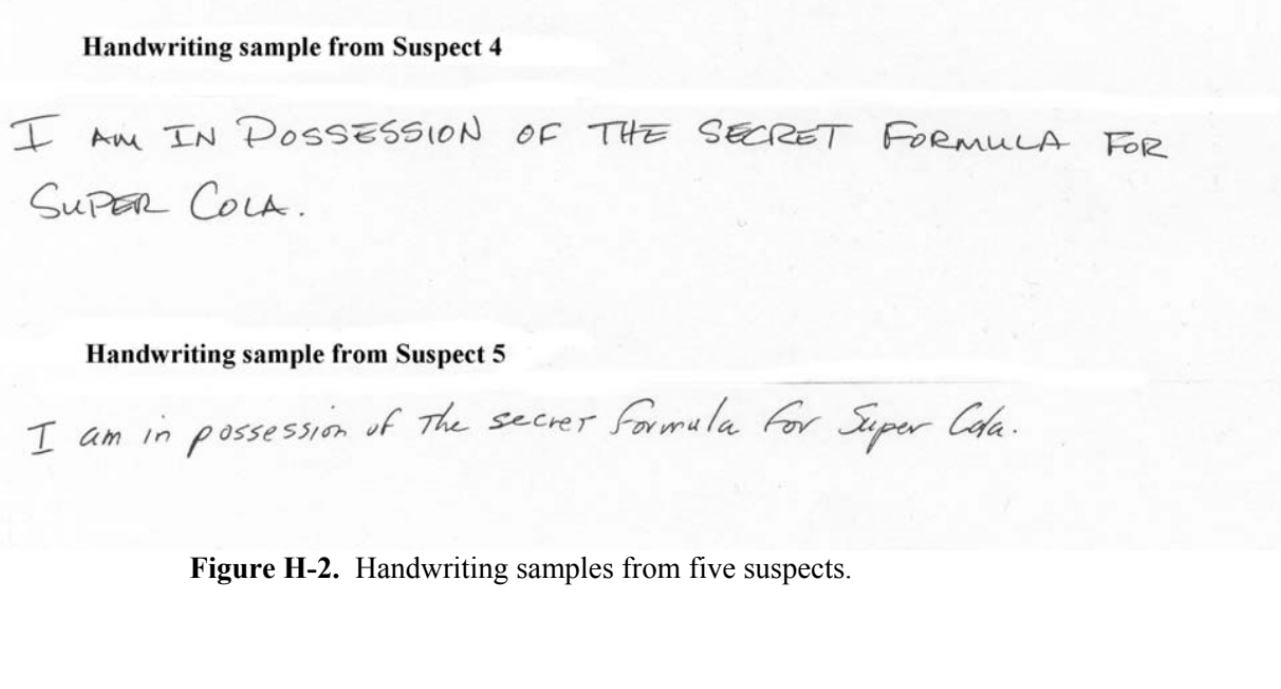
Figure H-2 contains samples of handwriting from 5 suspects. Can you determine who wrote
the ransom note shown in Figure H-1?
the ransom note shown in Figure H-1?
Activity 3: Blood Spatter Analysis
Watch the video below from the Smithsonian Institute about the different types of blood stains often seen at crime scenes.
Then try this quiz to see if you can remember what was in the video!
Also check out the infographic below from forensicnursing.org to learn about how blood is analysed at crime scenes.
Also, here's a great website on blood spatter types.

From Visually.
Week 10: June 8-12
Welcome to week 10! I will not put up a doodle poll as fewer and fewer students are using it so we'll just see you in class!
Zoom link Wednesday and Friday.
This week we will be exploring biotechnologies with a focus on a few key ones: Vaccines, GMOs, and Genetic Engineering. Let's explore these topics with text, videos, and activities below!
How do Vaccines Work?
(source: immunizebc.ca)
Your immune systemYour immune system is made up of a specialized network of organs, cells, and tissues that all work together to help protect you against disease. When a disease-causing germ (for example, a virus or bacteria) enters your body, your immune system:
When you get a vaccine, your immune system responds to the vaccine the same way it would to the real germ. It:
Also what are the differences between Antibiotics, Antivirals, and Vaccines?
Zoom link Wednesday and Friday.
This week we will be exploring biotechnologies with a focus on a few key ones: Vaccines, GMOs, and Genetic Engineering. Let's explore these topics with text, videos, and activities below!
How do Vaccines Work?
(source: immunizebc.ca)
Your immune systemYour immune system is made up of a specialized network of organs, cells, and tissues that all work together to help protect you against disease. When a disease-causing germ (for example, a virus or bacteria) enters your body, your immune system:
- Recognizes the germ as being foreign (not belonging in the body).
- Responds by making special proteins (called antibodies) that help destroy the germ. Most of the time, your immune system can’t act fast enough to stop the germ from making you sick. But by destroying the germ, it can usually help you get well again.
- Remembers the germ that made you sick and how to destroy it. That way, if you are ever exposed to the same disease germ in the future, your immune system can quickly destroy it before it has a chance to make you sick. This protection is called immunity.
When you get a vaccine, your immune system responds to the vaccine the same way it would to the real germ. It:
- Recognizes the germ in the vaccine as being foreign.
- Responds by making antibodies to the germ in the vaccine, just as it would for the real germ.
- Remembers the germ and how to destroy it. That way, if you are ever exposed to the disease-causing germ in the future, your immune system will be able to quickly destroy it before it has a chance to make you sick. This is how you get immunity from vaccines.
Also what are the differences between Antibiotics, Antivirals, and Vaccines?
|
|
|
Herd Immunity
(source: Johns Hopkins School of Public Health)
We have been hearing the phrase "herd immunity" a lot during this pandemic. There are a lot of misconceptions about what herd immunity is, and how whole populations respond to being immunized, partially immunized, or totally vulnerable.
What is herd immunity?When most of a population is immune to an infectious disease, this provides indirect protection—or herd immunity (also called herd protection)—to those who are not immune to the disease.
For example, if 80% of a population is immune to a virus, four out of every five people who encounter someone with the disease won’t get sick (and won’t spread the disease any further). In this way, the spread of infectious diseases is kept under control. Depending how contagious an infection is, usually 70% to 90% of a population needs immunity to achieve herd immunity. Immunity can be conferred through a vaccine or on account of people getting the disease.
How have we achieved herd immunity for other infectious diseases?Measles, mumps, polio, and chickenpox are examples of infectious diseases that were once very common but are now rare in the U.S. because vaccines helped to establish herd immunity. We sometimes see outbreaks of vaccine-preventable diseases in communities with lower vaccine coverage because they don’t have herd protection. (The 2019 measles outbreak at Disneyland is an example.)
For infections without a vaccine, even if many adults have developed immunity because of prior infection, the disease can still circulate among children and can still infect those with weakened immune systems. This was seen for many of the aforementioned diseases before vaccines were developed.
Other viruses (like the flu) mutate over time, so antibodies from a previous infection provide protection for only a short period of time. For the flu, this is less than a year. If SARS-CoV-2, the virus that causes COVID-19, is like other coronaviruses that currently infect humans, we can expect that people who get infected will be immune for months to years, but probably not their entire lives.
Activity 1: Try these herd immunity interactives
Click here to scroll through different scenarios for herd immunity.
Also try this simulation where you choose the rate of immunization in newborns and check the population of infected persons through time and reproduction of the virus.
Also try this game (go through the tour first) that gamifies epidemic prevention. It's very interesting! Can you achieve herd immunity?
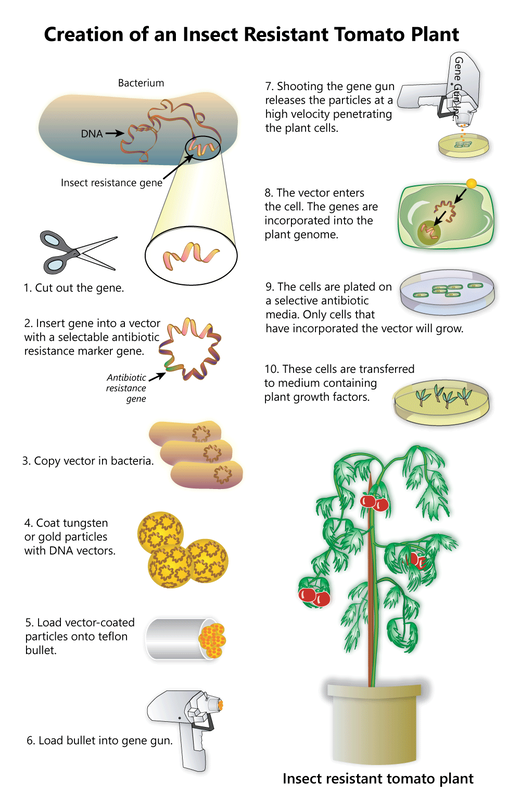
Genetically Modified Organisms
Here's another hot topic! A lot of people have misconceptions about GMOs -- and in relation to food in particular! Check out this information from learn.genetics at University of Utah.
What would you do in the following situations?
- You are a tomato farmer whose crops are threatened by a persistent species of beetle. Each year, you spend large sums of money for pesticides to protect your crops. A biotechnology company introduces a new strain of tomato plant that produces a natural pesticide, making it resistant to the beetle. By switching to this new strain, you could avoid both the beetle and the chemical pesticides traditionally needed to fight it.
- As a family physician, you often treat children who suffer from infectious diseases that could easily be prevented through vaccination. But the parents of many of your patients cannot afford the cost of vaccinations. You hear of a new approach that would reduce the cost to a fraction of its current price: genetically modified fruits and vegetables that contain various vaccines. By simply eating a banana, a child could be protected against diseases without getting a shot!
- You are the leader of a developing nation. Hunger is a problem among your citizens: the salty coastal wetlands of your country can't support the growth of needed crops, and your slow economy can't support importing enough food for everyone. A biotechnology company has genetically modified a rice plant that can thrive in salt water, providing your nation with the opportunity to feed its citizens while bolstering its economy.
What are those risks, and how likely are they to occur? In order to define them, we need to understand the science of plant genetic engineering.
For thousands of years, humans have been genetically enhancing other organisms through the practice of selective breeding. Look around you: the sweet corn and seedless watermelons at the supermarket, the purebred dogs at the park, and your neighbor's prize rosebush are all examples of how humans have selectively enhanced desirable traits in other living things.
The type of genetic enhancement that generates the most concern goes a step beyond selective breeding, however. Technology now allows us to transfer genes between organisms. For example, the tomato plant's beetle resistance relies on a gene from a bacterium (Bacillus thuringiensis), which scientists inserted into the tomato plant's genome. This gene, called cry1Ac, encodes a protein that is poisonous to certain types of insects, including the beetle.
How is this done? Gene transfer technology is simply a sophisticated version of a cut-and-paste operation. Once the desired gene is identified in the native organism's genome, it can be cut out, transferred to the target plant, and pasted into its genome. (The illustration to the right describes the "gene-gun" approach, which is one of several gene transfer methods.) Once the new gene has been introduced, the plant can be bred to create a new strain that passes the gene from generation to generation.
Information in Canada
Have you ever wondered where food comes from? When we think about it, a picture of a farmer planting seeds often comes to mind. But did you know that some seeds are genetically altered in a laboratory before being planted? These seeds are called genetically modified organisms (GMOs) and they grow into genetically modified (GM) foods. Health Canada makes sure that all foods, including GM foods, are safe for us to eat. Read on to learn more about GMOs and GM foods.
What are Genetically Modified Organisms (GMOs)?GMOs are organisms (like plants, animals or microorganisms) whose genetic material (DNA) has been altered in a laboratory. Their genes have been changed in a way that would not occur naturally.
GMOs can have their genetic material changed for one of three reasons:
- to introduce a desirable characteristic (making crops resistant against certain plant diseases)
- to remove an undesirable characteristic (to prevent browning in apples)
- to enhance a desirable characteristic that occurs naturally, but is insufficient
How are genetically modified foods regulated?Before a GM food can be sold in Canada, Health Canada makes sure it is safe to eat and will not harm your health or the environment. Health Canada completes an assessment on all GM foods to ensure they are as safe and nutritious as foods already in the marketplace before they are allowed to be sold. A safety assessment can take many years.
Are genetically modified foods labelled?It is not mandatory for GM foods to be labelled in Canada. However, some food companies choose to label their products “GMO free”.
Labelling of GM foods is challenging. This is because GM foods like sugar, canola and corn are widespread in our food supply. GM corn can be used to make high fructose corn syrup which is used in other foods (like cereal, yogurt, pop, frozen entrees, salad dressings and condiments). As a result, all of these foods would need to be labelled as having GM ingredients.
What are the benefits of genetically modified foods?GM crops have been developed to have certain benefits. GM foods may:
- Grow more easily in some environments (like dry soil conditions)
- Produce more crops, helping to keep food prices lower
- Ripen slower, last longer during shipping or bruise less easily
- Be less at risk for diseases caused by insects or viruses
- Need less pesticides (like herbicides and insecticides)
- Have improved nutrient content (for example, vitamin A found in Golden Rice, a GM rice crop used to fight malnutrition in developing countries)
- Can GM foods cause allergies? There is no evidence that GM foods increase the risk of allergic reactions. Transfer of genes from high allergy foods is discouraged. If they are used, tests are done to make sure the product does not cause allergies. No allergic reactions related to GM foods have been reported.
- Can GM foods cause resistance to antibiotics? There is no evidence to show that any antibiotic resistant genes used in GM foods can be transferred to humans.
- Can GM crops contaminate regular crops? GM crops may blow into fields close by that grow regular crops. Strategies to manage this are being looked at such as having a clear separation between GM and non-GM fields. The Canadian Food Inspection Agency (CFIA) continues to address this concern.
- Call food companies. If you are interested to know if a certain food contains GM ingredients, the food company may be able to answer your questions.
- Visit specialty stores. Some smaller food companies label their products as “GMO free.”
- Buy organic foods. GMOs are not permitted in organic farming.
- Plant a garden. When you buy plants or seeds, ask if they have been genetically modified.
Activity 2: Watch this film entitled Food Inc. about Food Production in the USA
What do you think about the food industry and its ethics? This is not about GMOs in particular but about our relationship with food and its production. We have some higher regulations in Canada but have you ever eaten a meal in the USA or products imported from the USA?
Week 9: June 1-5
Doodle Poll for this week: Indicate your attendance HERE.
Zoom links: Wednesday click here and Friday click here.
Zoom links: Wednesday click here and Friday click here.
Apologies for those expecting to see me last Friday. I had an appointment to fix my car. With social distancing it was the only appointment they had! I hear you had a wonderful experiment on heart rate with Mr. Campbell!
This week, we will be looking at the eye in terms of anatomy and function. This is new content and we are excited to present several aspects of the parts of the eye, and how you see. There is learning content including videos and interactives as well as some activities!
Let's start with a great video that summarizes our content. Can your eyeballs pop out? Yes! It's called globe luxation. Check that out and more, below!
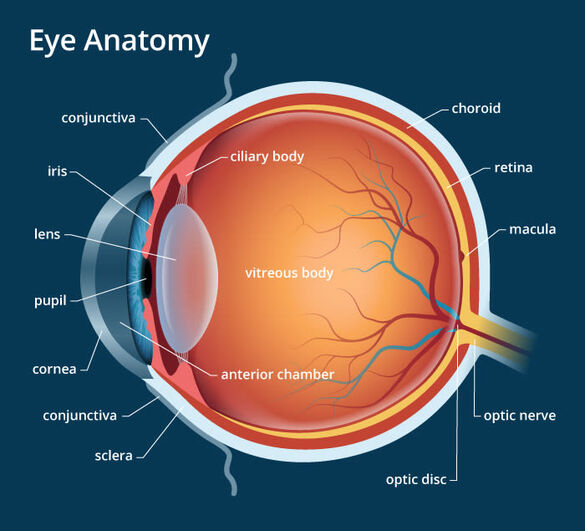
Eye Anatomy
The eye has several important structures that help us see. Here is how the eye works:
In a number of ways, the human eye works much like a digital camera:
- Light is focused primarily by the cornea — the clear front surface of the eye, which acts like a camera lens.
- The iris of the eye (the colored part) functions like the diaphragm of a camera, controlling the amount of light reaching the back of the eye by automatically adjusting the size of the pupil (aperture). The pupil is the black part of the eye (the hole in which light passes depending on how large it is).
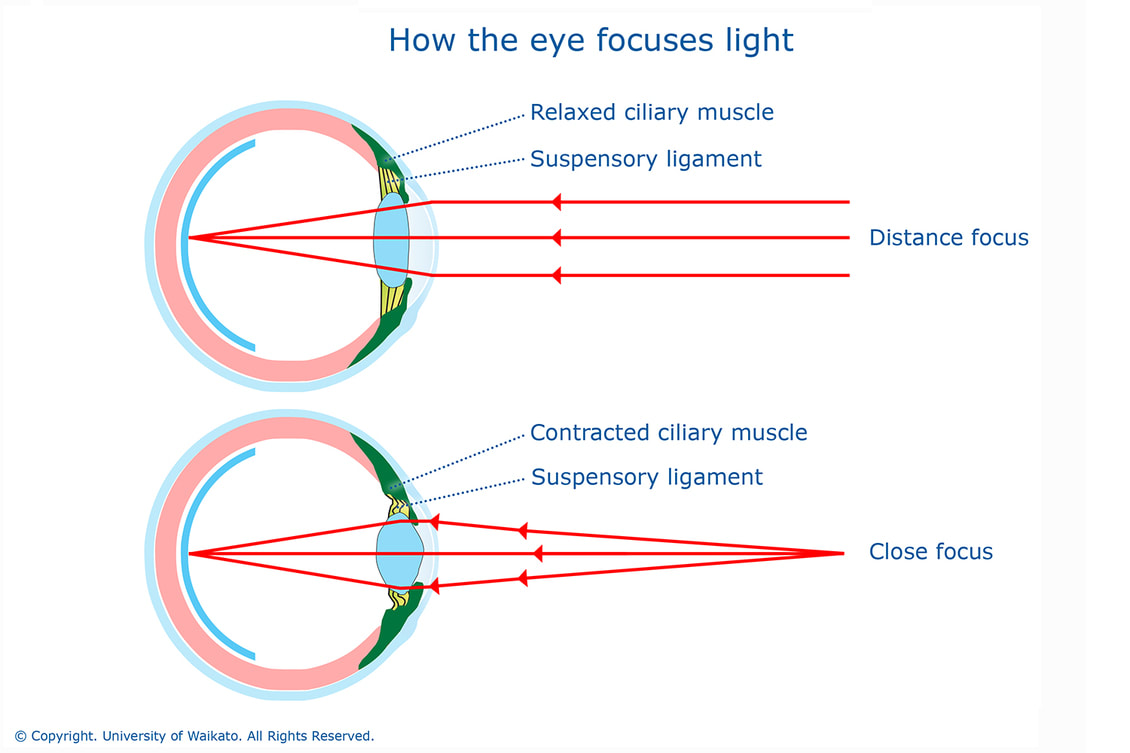
- The eye's crystalline lens is located directly behind the pupil and further focuses light. Through a process called accommodation, this lens helps the eye automatically focus on near and approaching objects, like an autofocus camera lens.
- Light focused by the cornea and crystalline lens (and limited by the iris and pupil) then reaches the retina — the light-sensitive inner lining of the back of the eye. The retina acts like an electronic image sensor of a digital camera, converting optical images into electronic signals. The optic nerve then transmits these signals to the visual cortex — the part of the brain that controls our sense of sight.
Activity 1: Eye Anatomy and How We See (Interactives)
Click HERE to explore the anatomy of the eye. After you have gone through the different anatomical features, click on the green arrow that says "Discover how we see" to explore the adjustments made by the eye in different amounts of light, and then keep clicking to see how we focus on particular images. This is an excellent exploration!
You can also click HERE for a tour of the eye from the external anatomy (outside from your face) to the inside.
Summary: The eye focuses light in a similar way to when you use a magnifying glass to concentrate the Sun’s rays onto a piece of paper. The distance from the magnifying lens to the piece of paper is the focal length. For the eye, light from distant objects is focused onto the retina at the back of the eye. The eye is about the size of a table tennis ball, so the focal length needs to be about 2.5 cm.
Behind the aqueous fluid is the second lens system. It consists of a convex lens that is soft and pliable. The ciliary muscle is a circular ring of muscle that attaches all the way around the lens. This ciliary muscle can change the shape of the crystalline lens by stretching it at the edges. It is attached to the lens by zonules (ligament fibres that can be tight or loose).
When you are looking at a near object, the lens needs to become more rounded at the central surface in order to focus the light rays. This ability to change focus for close-up objects is called accommodation.

Activity 2: The Blind Spot and the Visual System
1. Did you know you had a blind spot?
Light gets into they eye by passing through the pupil. It hits the retina at the back of the eye. The retina is covered with light-sensing proteins. They relay what they sense to the optic nerve which carries the information back into the brain. The problem is, the optic nerve ends in the field of the retina itself. This is a little like having to plug the power cable for a TV directly into the screen. It creates a dark spot. Most of the time, the other eye will see what's happening in its partner's blind, but if the blind spots overlap while looking at a certain object, or if the person is only looking through one eye, the brain just fills in the spot looking at the surrounding picture.
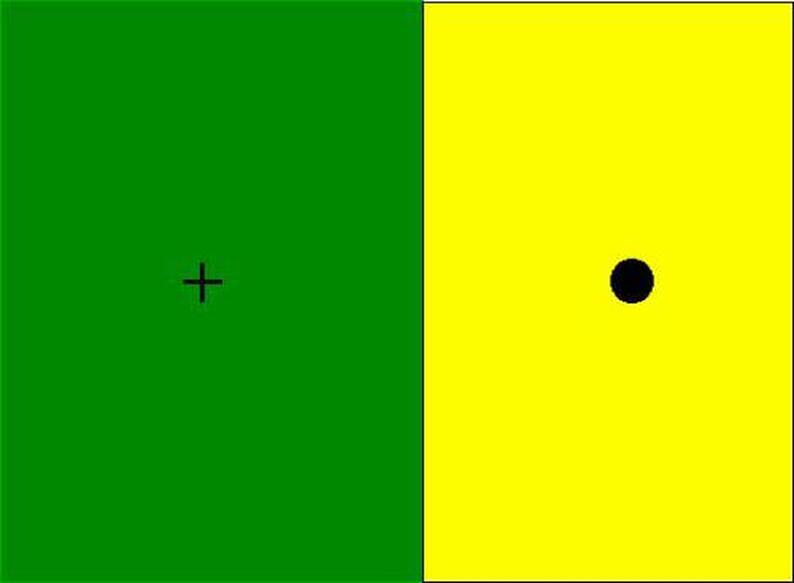
2.Locating your blind spot: (an area where an image is unseen)
Cover your left eye and look at the dot on the left in this image. Be aware of the cross on the right, but don't look at it - just keep your eye on the dot. Move your face closer to the monitor, and farther away. At some point, you should see the cross disappear. Stay at that point and close your right eye. Stare at the cross, and you should see that the dot has disappeared. It doesn't just happen with a white background. Try the same with colored paper, and your mind will fill in the background color of the paper when the mark gets in your blind spot. You don't see as much of the world as you think.
3. Repeat the same steps with the image below. What do you notice?
Nearsightedness and Farsightedness
Do you wear glasses? Does someone in your family or your friend group wear glasses? This is because they might have either myopia or hyperopia. (They might have other conditions too, but these are two simple eye defects). In this learning piece, watch the videos below to understand these two vision problems and how they are corrected.
|
|
|
Quizzes
Test your knowledge of eye anatomy!
A quizlet matching game: HERE
A labelling game with the eye that makes boingy sounds when you get wrong answers: HERE
Week 8: May 25-29
Doodle Poll for this week: Indicate your attendance HERE
Zoom links: Wednesday click HERE; Friday click HERE.
This week, we will be studying new content about the heart and circulation. As you might recall, we were about to finish heart anatomy and dissect the heart before school was released. Let's learn a bit about that this week. There is learning content including videos and also some activities to complete. We will go through this during class as well on Wednesday and Friday.
Since we are starting a new topic, let's begin with a video that gives an overview of how the heart pumps blood and why. Then proceed to the lesson and quizzes for heart anatomy and circulation so you become an expert before next class!
Heart Anatomy
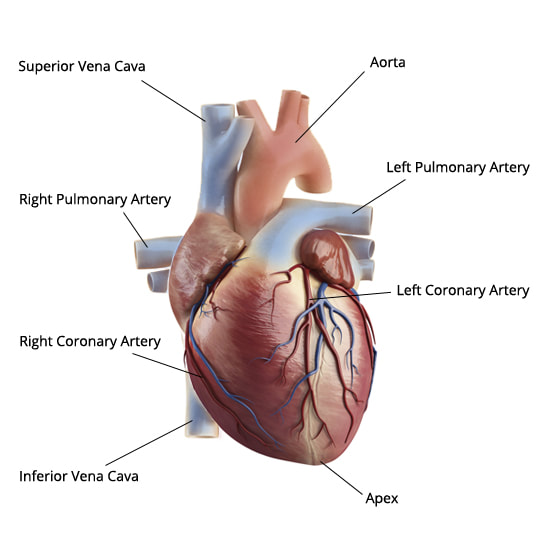
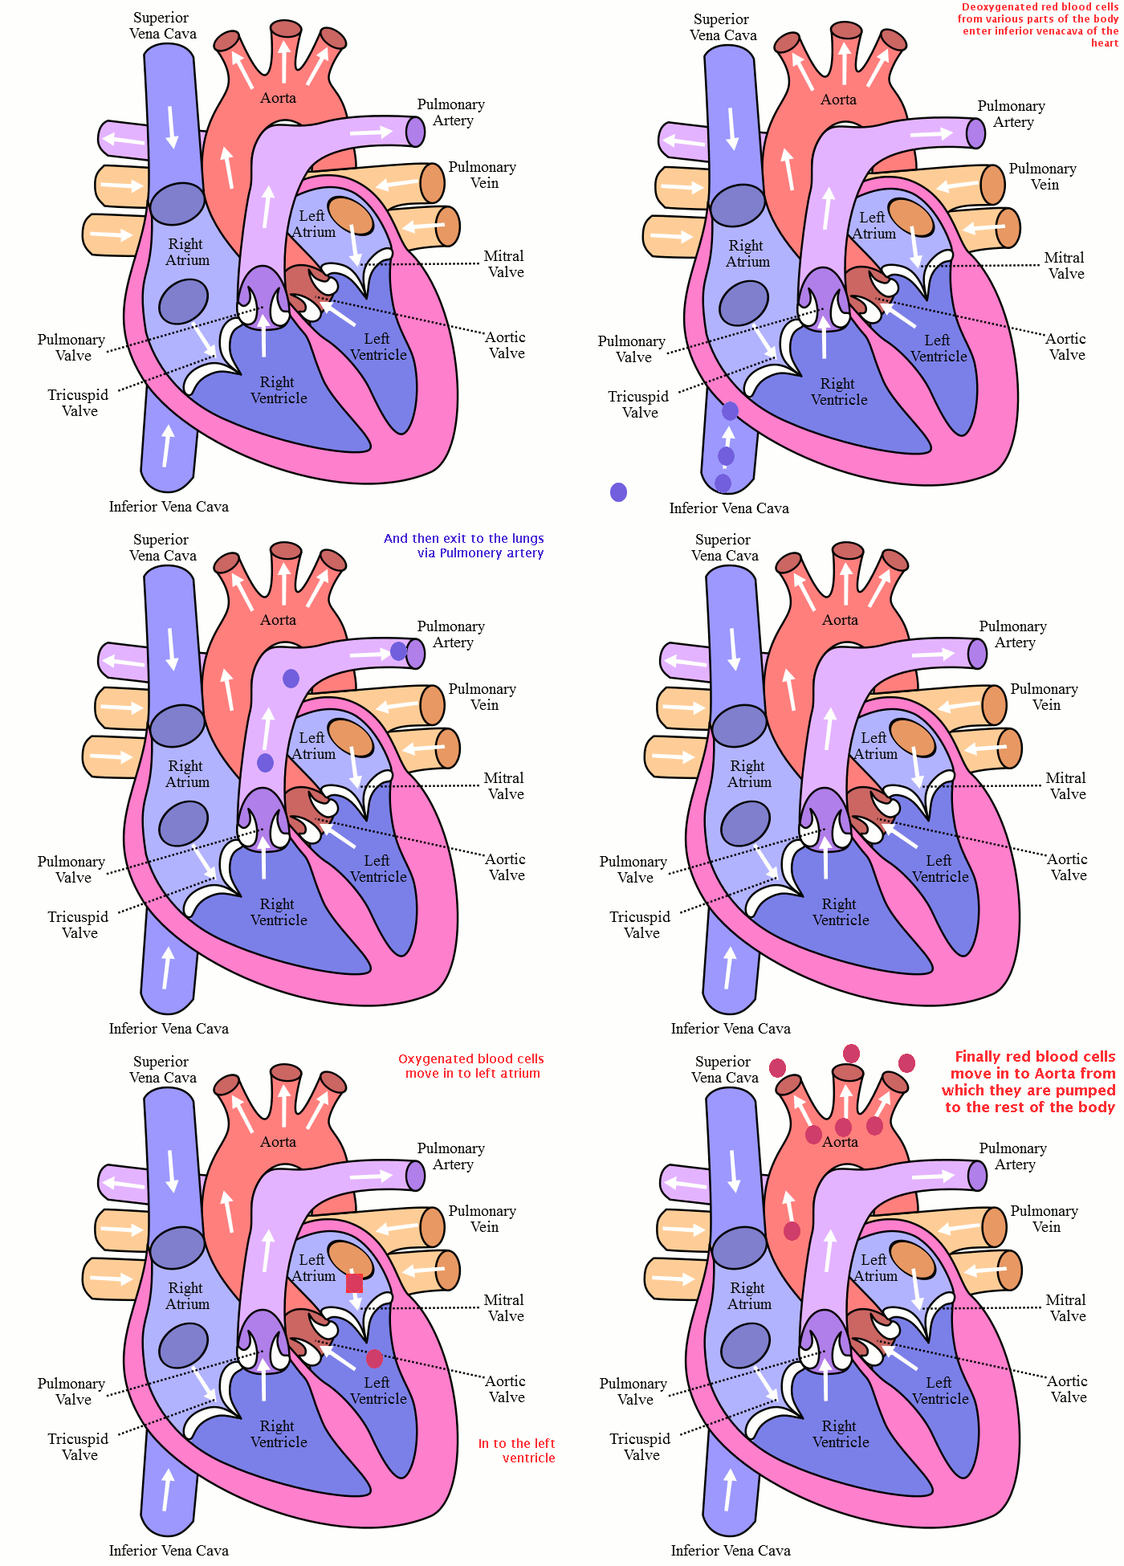
The heart is a complex organ and one of the big problems that students face is that the diagrams are mirror image. In other words, the left side of the diagram is the right side of the heart. It's because the diagram is drawn as though the heart is in your chest.
What are the parts of the heart?
Let's have a look at the external and internal anatomy. There are four main chambers and a bunch of blood vessels.
Notice that the labels are on opposite sides: those on the left of the picture are the right side of the heart and vice versa.
Notice there are blood vessels. These include arteries and veins. I always tell students "A for away". This means arteries always carry blood away from the heart. And "V for vein" -- Veins carry blood towards the heart. There are some special blood vessels: the Aorta (also "A for away" as it carries blood to the brain and upper body. And the vena cavas (V for Vein) which carry blood back to the hear from the brain and upper body (superior) and from the rest of the body below the heart (inferior).
The chambers of the heart include two ventricles and two atria (singular: atrium). They are labelled right and left and we will go through their functions too. For now, let's try to get a handle on the anatomy.
Activity 1: Learn the anatomy of the heart
Step 1 -- Where is the heart located in your chest? Is it high up or low down? Use the stethoscope and find out the heart location by listening to a heartbeat. Click here.
Step 2 -- learn the parts of the heart either by memorizing the diagram above, or by visiting the website here and going through each part individually.
Step 3 -- test out or practice labeling the heart yourself. Click here to practice and check your answers.
Step 4 -- solidify your knowledge by doing this online quiz of the different vessels and valves here.
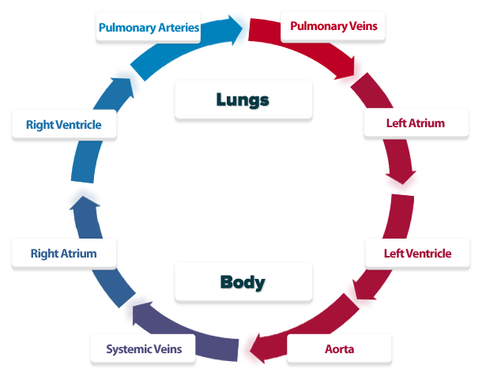
Blood Flow Through the Heart
This can be a difficult topic but we need to remember why the heart is pumping blood in the first place. We learned from the respiratory system that oxygen exchange happens in tiny capillaries that surround the alveoli. Why does this matter? What it means is that blood is a big highway for oxygen uptake and delivery around the body, and it takes CO2 from body cells and delivers it back to the lungs to be breathed out. But how does all this happen?
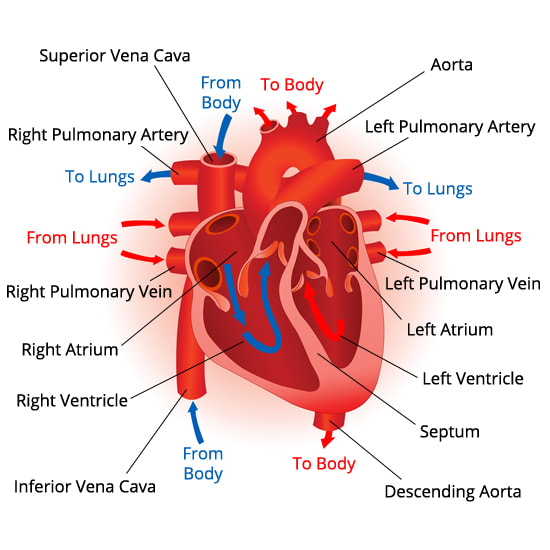
The body circulation is a "Figure 8." It seems like there are a lot of vessels entering and exiting the heart. That is because half of them are for the body and the other half are for the lungs.
Here is a summary that you can read as a story with the animated GIF below:
- The inferior and superior vena cava return deoxygenated blood from the body back to the heart; all the oxygen was delivered to the cells and the blood picked up waste CO2; it needs to dump off CO2 in the lungs.
- So the inferior and superior vena cava bring blood to the right atrium where it goes through the tricuspid valve into the right ventricle
- Look at which vessel leaves the right ventricle in the diagram above! It is the pulmonary artery that goes away to the lungs.
- Ok, so the blood goes to the lungs and does its thing: dumps off CO2 and picks up oxygen. But now that freshly oxygenated blood needs to go back to the body cells or they'll die. So the blood comes back to the heart via the pulmonary veins. Find those in the diagram.
- When the blood comes back from the lungs via the pulmonary veins, it returns to the left atrium and then is released into the left ventricle. This is the bigger of the two ventricles because it needs to pump to the whole body.
- The left ventricle pumps blood through the aortic valve which goes to the aorta (and its small vessels leading to the brain and upper body) then down behind to the rest of the body below (gravity helps).
That's the journey of the blood!
Click here for a scratch animation.
Activity 2: Test your knowledge of blood flow through the heart
Step 1: Try this quiz to know the correct order of the blood flow through the heart. Click here.
Step 2: Try this timed matching game for blood circulation here or if you're feeling daring do the asteroid version here!
Week 7: May 18-22

This week we will look at sound waves and how they are measured! We talked about stimuli last week so we invite you to think about sound as a stimulus to the brain. We'll explore the kinds of waves we hear and how they are measured.
Doodle Poll: Click HERE
Zoom links: Wednesday click HERE and Friday click HERE.
What is Sound?
(Source: study.com)
It's the age-old question: If a tree falls in the woods, and no one is there to hear it, does it make a sound? Well, first of all, what exactly is a sound?
Sound is a wave, but so are lots of things. More specifically, sound is a wave made of vibrations in the air. When something makes a sound, it vibrates the air molecules, which sends a chain reaction through the air until it reaches our ear drums. When our ears pick up that sound, signals are sent to our brain so that we can interpret what we're hearing. So based on that physics definition, the tree really does make a sound whether someone is there to hear it or not!
Mediums and Wave Types
In space, no one can hear you scream! And as scary as that statement may be, that shouldn't be altogether surprising. If sound waves are vibrations in the air, then take away that air... and bye-bye vibrations! Sound waves need a medium (or material) to travel through. These kinds of vibrational waves have another name: longitudinal waves. In fact, there are two main types of waves: transverse and longitudinal.
Longitudinal waves are where the vibration moves parallel to the direction the wave is traveling. A Slinky can help us understand this, because a longitudinal wave can be created by pushing a Slinky along its length, sending a pulse across it. Transverse waves, on the other hand is where the vibration is at 90 degrees to the motion of the waves. This time we have to move the Slinky side-to-side. Light waves and water ripples are transverse, but sound waves are longitudinal.
Features of Waves
Scientists love to name things. It's not enough to name the wave itself, we also need to name some of the wave's features. Two of these are called compressions and rarefactions, as shown here. A compression is a high-density part of the wave (the part where the slinky is compressed). It is the peak of the wave. A rarefaction is a low-density part of the wave (the part where the slinky is most spread out). This is the trough of the wave.
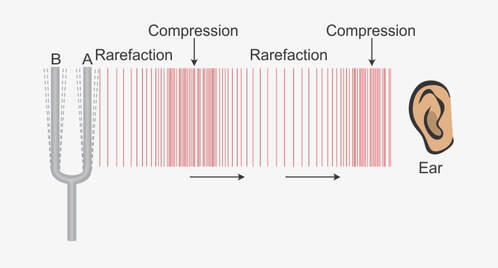
One difficult part of understanding this topic is the question of why these compressions and rarefactions are considered to be a wave at all. After all, it doesn't look very... wavy. But, if we plot particle density across the previous image, we can see how we know that it is a wave. Much more wavy, don't you think?
We can also use this diagram to measure the so-called wavelength of the wave. This is the distance between two identical parts—from a compression (peak) to the next compression, or from a rarefaction (trough) to the next rarefaction. A wavelength is the length of one full wave, in meters.
Last but not least, frequency. A sound wave's frequency is a number that tells you how many waves pass by each second. For example 60Hz (Hertz) means that there are 60 waves per second.

Activity 1: Making Sounds Online
Check out this amazing link shared by Mr. Campbell!
In this digital app, you can see the compression waves formed by different pitches, from low to high. What do you notice about the compression wave as the pitch changes? Click HERE.
This one is super cool! It's really psychedelic! You can choose instruments or make your own sounds by using the microphone icon to see the spectrogram of the sounds. Click HERE.
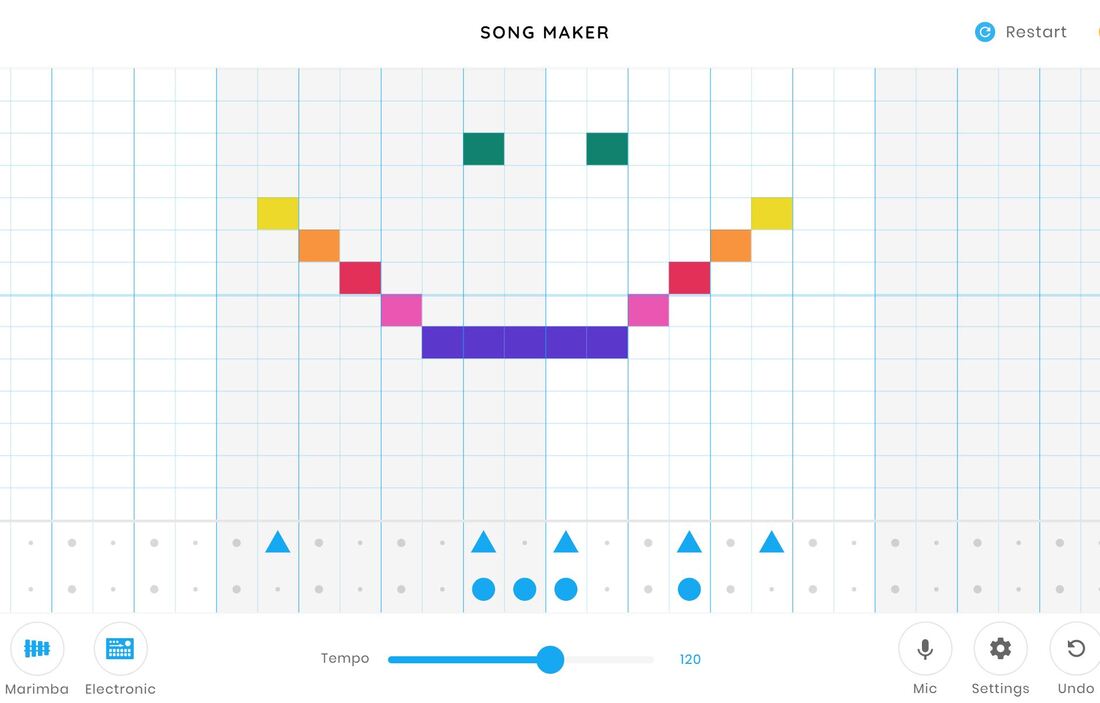
Finally, try making a song by using pitches in the form of an image. I made a happy face and then hit "play". You can add percussive sounds too. What does your song look like and sound like?
Click HERE to "draw" a song.
Activity 2: Making Sounds with bottles and glasses
In this activity, you can make sounds using bottles and wine glasses at home. Different sized containers, or the same sized containers (like wine glasses from a matching set) can make different pitches when struck or, in the case of bottles, when you blow across the opening at the top.
In this YouTube video, you will see how to make sounds at home.
Materials
- bottles of various sizes
- wine glasses (same or different; either is fine)
- water
- a small object to strike the glasses but that won't shatter any
- link to digital oscilloscope: HERE
- link to virtual oscilloscope with piano keyboard: HERE
Bonus Level: Can you make a song or a simple tune using your bottles or wine glasses? If so, record it and send it to me at [email protected]
Student Submissions
Abbie C -- see below
Abbie C -- see below
| img_2065.mov | |
| File Size: | 9007 kb |
| File Type: | mov |
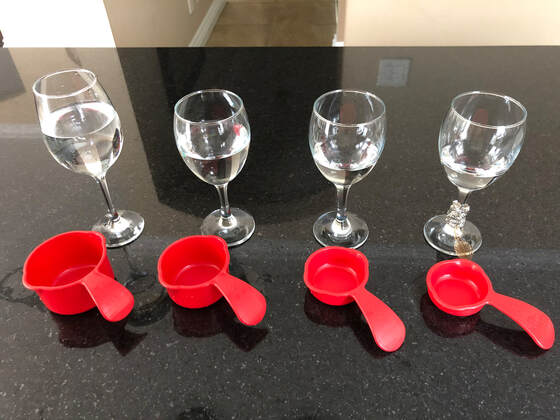
Ashley S
Activity 3: Singing Wine Glasses in your Kitchen
Try this activity at home. Can you make a wine glass "sing"? Watch the Sci Guys below and learn more about sound particles and how we hear sounds that are made using "slip stick motion." Then try it yourself with your own wine glasses at home.
Try this activity at home. Can you make a wine glass "sing"? Watch the Sci Guys below and learn more about sound particles and how we hear sounds that are made using "slip stick motion." Then try it yourself with your own wine glasses at home.
Did you know that the glass harp is a real instrument? Musicians have sets of specially tuned glasses of different sizes and play entire pieces by rubbing the rims of the glasses just like in the simple demonstration above.
Check out Hedwig's Theme from Harry Potter played on glass harp, below. The duo has memorized all the locations of the glasses and know the pitch of each one!
Week 6: May 11-15
Welcome to Week 6! This week we will be learning about how stimuli affects us and our environments. There are some different activities and tests we will do here and in class together on Wednesday or Friday, whichever you choose! The meetups are at the same times: 10am on both days.
Doodle Poll for this week's classes is HERE.
ZOOM: Wednesday click HERE; Friday click HERE.
What is a stimulus? (Source: study.com)
Stimuli (singular: stimulus; plural: stimuli) are constantly affecting us and our daily lives. Therefore, it is important to understand how stimuli can cause changes in our environment and how we are able to adapt to them. Our environment is constantly changing, and in order for us and other living things to survive those changes, we must be able to respond to them. Any detectable change in the environment is called a stimulus. Usually, a stimulus is a product of change in an energy source or force, such as light, or sound, or heat. As humans, we detect and respond to stimulus in order to survive.For example, if you walk outside on a very sunny day, your pupils will constrict to protect your eye from taking in too much light and being damaged. Your body reacts to the stimulus (the light) to protect you. Let's take a closer look at how a stimulus is detected.
Detection of Stimuli
In order for an organism (such as a plant or an animal) to adjust to a change in the environment, it must first be able to detect (or physically recognize) the change. This detection of a stimulus is called sensitivity.
In humans, sensitivity is due to portions of the nervous system called receptors. Receptors are typically neurons or cells that are able to sense changes in the environment. For example:
Tropisms
After detecting a stimulus, organisms must provide a response in order to account for the change. A tropism is a response that an organism makes to a stimulus. An example of a common tropism in plants is phototropism (or light response). Plants grow towards light sources, and if the direction of light is changed, the plant will also change its direction of growth to accommodate for survival.
Another example would be a geotropism (or response to gravity). Jellyfish, which are marine organisms, swim based on gravity, and when the force of gravity is changed in their environment, they also change their swimming activity to accommodate. Likewise, humans have gravity receptors in our vestibular system (in our ears) that help us balance and stay stable in relation to the ground and our surroundings.
Reaction Time
One thing you can test in terms of stimulus is Reaction Time. This is different that reflexes. Reflexes are involuntary (you don't choose how to respond, for example when touching a hot stove; your body reacts without you making a decision). Reaction times are based on you concentrating on a stimulus. Visual or auditory stimulus can be used to test your reaction time.
Activity 1: Test your Reaction Times online!
Try this reaction time test. You click the blue banner at the top of the page, and click when it turns green.
Do the five trials and record your number in milliseconds. Where did you fit on the curve? What's your average? Let's compare in class!
Click HERE.
In this second test, which is similar. Test your driving skills. It's a quick test that tells you your "age" as a driver. Reaction times are really important when we are taking in multiple stimuli while driving: people crossing the road, bad lane changes by other drivers, lights changing from green to red, deer jumping out. What do you think would happen if you were really tired? If you consumed alcohol or drugs? Try the test when you are feeling fresh and come back later when you're very tired and give it a try again. Could you sustain a high reaction time if your drive home was 30 or 40 minutes and you were very fatigued?
Try the driving reaction time test HERE.
Doodle Poll for this week's classes is HERE.
ZOOM: Wednesday click HERE; Friday click HERE.
What is a stimulus? (Source: study.com)
Stimuli (singular: stimulus; plural: stimuli) are constantly affecting us and our daily lives. Therefore, it is important to understand how stimuli can cause changes in our environment and how we are able to adapt to them. Our environment is constantly changing, and in order for us and other living things to survive those changes, we must be able to respond to them. Any detectable change in the environment is called a stimulus. Usually, a stimulus is a product of change in an energy source or force, such as light, or sound, or heat. As humans, we detect and respond to stimulus in order to survive.For example, if you walk outside on a very sunny day, your pupils will constrict to protect your eye from taking in too much light and being damaged. Your body reacts to the stimulus (the light) to protect you. Let's take a closer look at how a stimulus is detected.
Detection of Stimuli
In order for an organism (such as a plant or an animal) to adjust to a change in the environment, it must first be able to detect (or physically recognize) the change. This detection of a stimulus is called sensitivity.
In humans, sensitivity is due to portions of the nervous system called receptors. Receptors are typically neurons or cells that are able to sense changes in the environment. For example:
- Photoreceptors in the eyes detect changes in light
- Thermoreceptors detect changes in heat
- Baroreceptors detect changes in pressure
Tropisms
After detecting a stimulus, organisms must provide a response in order to account for the change. A tropism is a response that an organism makes to a stimulus. An example of a common tropism in plants is phototropism (or light response). Plants grow towards light sources, and if the direction of light is changed, the plant will also change its direction of growth to accommodate for survival.
Another example would be a geotropism (or response to gravity). Jellyfish, which are marine organisms, swim based on gravity, and when the force of gravity is changed in their environment, they also change their swimming activity to accommodate. Likewise, humans have gravity receptors in our vestibular system (in our ears) that help us balance and stay stable in relation to the ground and our surroundings.
Reaction Time
One thing you can test in terms of stimulus is Reaction Time. This is different that reflexes. Reflexes are involuntary (you don't choose how to respond, for example when touching a hot stove; your body reacts without you making a decision). Reaction times are based on you concentrating on a stimulus. Visual or auditory stimulus can be used to test your reaction time.
Activity 1: Test your Reaction Times online!
Try this reaction time test. You click the blue banner at the top of the page, and click when it turns green.
Do the five trials and record your number in milliseconds. Where did you fit on the curve? What's your average? Let's compare in class!
Click HERE.
In this second test, which is similar. Test your driving skills. It's a quick test that tells you your "age" as a driver. Reaction times are really important when we are taking in multiple stimuli while driving: people crossing the road, bad lane changes by other drivers, lights changing from green to red, deer jumping out. What do you think would happen if you were really tired? If you consumed alcohol or drugs? Try the test when you are feeling fresh and come back later when you're very tired and give it a try again. Could you sustain a high reaction time if your drive home was 30 or 40 minutes and you were very fatigued?
Try the driving reaction time test HERE.
Activity 2: Conduct a Reaction Time Experiment at Home
Background Information
For this activity, you will perform a test for reaction time different stimuli. Reaction time is how long it takes an organism to respond to a stimulus in the environment. Even between organisms of the same species, some people are faster than others.
Part 1: How fast do you react?
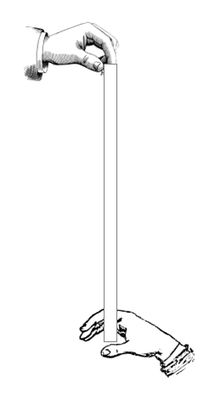
To test reaction time, you can use the ruler test on someone in your home. The ruler test gives you a measure of how quickly someone reacts when a ruler is dropped, without warning, and this person tries to catch it. The distance the ruler falls before it is caught is a measure of the reaction time. The reaction time for the voluntary reaction involved in the ruler test includes how long it takes for the information to travel from the sensory receptors in the eye to the brain, for the brain to process the information, and for the brain to send a signal to the muscles to react.
Materials Required
· 30 cm ruler, or a ruler made from household materials such as cardboard or a paint stick
· Paper and writing materials
Instructions (See my Youtube Video below for a demonstration)
o Ask the person you are testing (your test-subject) to hold out their hand, with their fingers and thumb stretched apart.
o Hold the end of a 30 cm ruler (the end that starts with zero) between your test-subject’s open fingers. If you do not have a ruler, try making one with materials from your home such as cardboard or a paint stick.
o Explain to your test-subject that you will drop the ruler, without warning them, and that they will have to try and catch it, as quickly as they can, by pinching their fingers and thumb together.
o Drop the ruler and record where the test subject caught it (e.g. 25 cm).
o Repeat at least 4 more times.
o Change roles and test your own reaction time.
o What was the average reaction time (measured in cm of distance traveled by the ruler) of five trials for you?
o What was the average reaction time of five trials for your partner?
Part 2: What factors affect reaction time?
·What do you think might affect a person’s reaction time? Think of one condition or variable you could change for the ruler test. Could the time of day or additional distractions such as music or conversation make a difference? What if you asked the test subject to close their eyes and used a different stimulus, such as a sound to indicate when you were dropping the ruler? What if you used more than one stimulus at once? Dr. Ausman used auditory stimulus only. Could think of a different variable?
· Choose what you would like to test and write a testable question: How is reaction time affected when ______________?
· Write your hypothesis for the question you are testing. What do you think will happen? Why?
· Design and perform your experiment. Think about how you will control the variables in your experiment.
· Record and organize your results.
· What can you conclude based on the results of your experiment about how different types of stimuli are received and processed by the brain?
Analysis
In what situations do you think a short reaction time is important? Do you think it is helpful to know what can affect reaction time in these situations? Why or why not?
Activity 3: Optical Illusions and Visual Stimulus
We will be looking at optical stimuli in our zoom classes this week. Check out the following video about why your brain sees strange things with optical illusions -- in essence, how our brains interpret emotions, faces, and edges in images.
Week 5: May 4 - 8
Doodle Poll for this week's classes is HERE.
Zoom Link Wednesday is here.
Zoom link Friday is here.
This week's topic from the Ministry is about diffusion and osmosis. What are these terms and what do they represent?
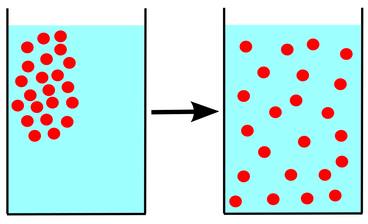
We already learned about diffusion in our class. This is the act of moving from an area of high concentration to one of low concentration. Recall the "people in the elevator" analogy. If you shove fifty people in an elevator and then open the doors, people will want to get out -- to an area of lower concentration. This principle is what makes fire extinguishers and hair spray cans work. The gases in those containers are under high pressure because there are so many particles in them (many more than the outside world). When you depress the nozzle, you open a pinhole sized hole where molecules of gas want to get out from the pressurized environment. They come racing towards the region with less concentration -- the open room into which you're spraying your hair, for example!
But what is osmosis? Osmosis is the diffusion of water (and only water)!
Thinking about osmosis means you have to change your brain around a little bit. Instead of thinking about where the solute particles above move (like in the picture above), if the red solute particles can't move, which way would the water go instead?
Some conditions have to be met for there to be osmosis and our cells do this a lot. Our cell membrane is semi-permeable. It means that some things can pass into cells by crossing the membrane and some things can't. We don't want just anything passing into a cell. But water can pass in and out. Have you ever seen your celery go limp in the fridge? That is because water left the cells, making them limp. There's not enough water pressure in the cells and the celery gets bendy and rubbery instead of firm. It's the same when your house plants look sad and droopy.
Animal cells and plant cells react differently to the movement of water. After all, you don't get droopy and watering your pet dog isn't about osmosis. But it is to a certain extent in the sense that our blood pressure and other cellular functions rely on having enough but not too much water in the cells. If there is too much water in cells, they will burst! How do we manage all of this? Check out this great video by the Amoeba Sisters below!
What about drinking sea water if you are stranded in the middle of the ocean? Do you think it would be a good idea? Why or why not? If water loves salt and flows to areas of high salt concentration, what would happen if you drank sea water?
Watch this video to find out!
Watch this video to find out!
This week we are going to work on a few activities to explore these topics!
Activity 1: Cell Interactive -- Try this first!
Using what you have learned about osmosis, try this interactive from the same website that you used to build a monster using genetics. What you think will happen to the blood cell, the elodea (plant) cell, and the paramecium (single celled animal) in each of the solutions. Remember:
- hypotonic means less salt in the water compared to the cell
- isotonic means the same amount of salt compared to the cell
- hypertonic means more salt in the water compared to the cell
Which way will the water go?
Also remember, plant cells love to have water rush in! Their cell walls prevent them from bursting. This is called turgor pressure. Animal cells don't respond well to water rushing in and they can burst! This is called cytolysis.
Activity 2: Lab -- "Something Fishy Happened!"
In this lab, you are going to explore a problem and then use gummy bears to find the answer!
Click HERE for my video. It's too large for YouTube.
Context
Problem
How does the tonicity (saltiness) of water affect cells? And why did group A win the fish competition?
Materials
- five gummy bears
- five small dishes to place your gummy bears in solution (small bowls or cups or tupperware)
- water
- salt
- ruler
- kitchen scale (optional)
Procedure
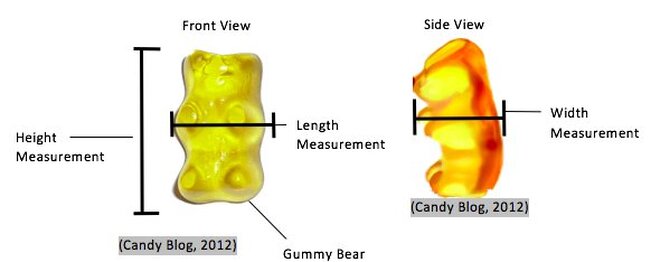
1. Measure the width, length and height of your control gummy bear before the experiment and record the data in your observation table (below) under "control." If you have a kitchen scale, also record the mass of the gummy bear. Set that gummy bear aside so you can compare it with the ones being tested later.
3. Prepare the following four solutions:
- 125mL (half a cup) tap water or distilled water (preferred)
- 125 mL water plus 1 teaspoon salt
- 125 mL water plus 2 teaspoons salt
- no water and three tablespoons of salt
4. Predict what you think will happen to the gummy bears in each case when left in these conditions for 6 to 8 hours (see prediction table below). Write down your predictions based on what you have learned about osmosis.
5. Place your gummy bears in each of the conditions and leave them on the counter for 6 to 8 hours or overnight.
6. Record your observations after the time has elapsed (width, height, length of each gummy bear).
Activity 1: Cell Interactive -- Try this first!
Using what you have learned about osmosis, try this interactive from the same website that you used to build a monster using genetics. What you think will happen to the blood cell, the elodea (plant) cell, and the paramecium (single celled animal) in each of the solutions. Remember:
- hypotonic means less salt in the water compared to the cell
- isotonic means the same amount of salt compared to the cell
- hypertonic means more salt in the water compared to the cell
Which way will the water go?
Also remember, plant cells love to have water rush in! Their cell walls prevent them from bursting. This is called turgor pressure. Animal cells don't respond well to water rushing in and they can burst! This is called cytolysis.
Activity 2: Lab -- "Something Fishy Happened!"
In this lab, you are going to explore a problem and then use gummy bears to find the answer!
Click HERE for my video. It's too large for YouTube.
Context
- During a fishing competition in the Iles de la Madeleine, one of the competing groups, Group A, brought back a mackerel from the Gulf of St. Lawrence that weighed slightly less than the one caught by another group of competitors, Group B. Once ashore, Group A cleaned the fish in a pail of fresh water. Group A ended up winning the competition for capturing the heaviest fish! Why did they win? Complete the activity below and use your research skills to give a detailed explanation.
- The Gulf of St. Lawrence is a body of salt water.
Problem
How does the tonicity (saltiness) of water affect cells? And why did group A win the fish competition?
Materials
- five gummy bears
- five small dishes to place your gummy bears in solution (small bowls or cups or tupperware)
- water
- salt
- ruler
- kitchen scale (optional)
Procedure
1. Measure the width, length and height of your control gummy bear before the experiment and record the data in your observation table (below) under "control." If you have a kitchen scale, also record the mass of the gummy bear. Set that gummy bear aside so you can compare it with the ones being tested later.
3. Prepare the following four solutions:
- 125mL (half a cup) tap water or distilled water (preferred)
- 125 mL water plus 1 teaspoon salt
- 125 mL water plus 2 teaspoons salt
- no water and three tablespoons of salt
4. Predict what you think will happen to the gummy bears in each case when left in these conditions for 6 to 8 hours (see prediction table below). Write down your predictions based on what you have learned about osmosis.
5. Place your gummy bears in each of the conditions and leave them on the counter for 6 to 8 hours or overnight.
6. Record your observations after the time has elapsed (width, height, length of each gummy bear).
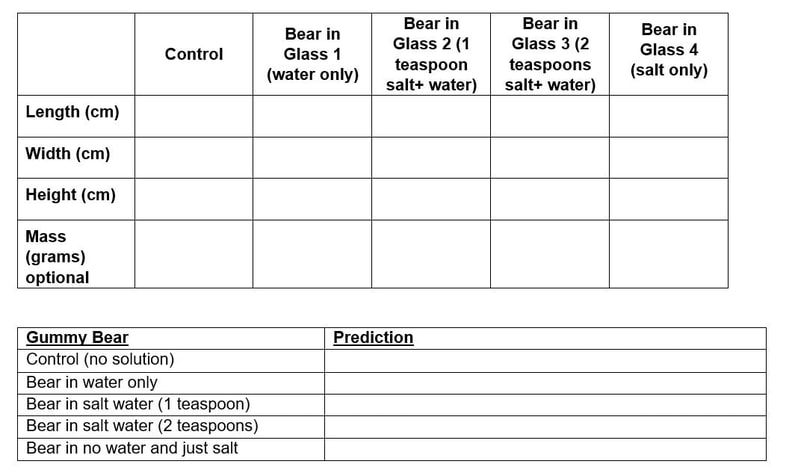
Predictions and Observations:
Discussion
What did you observe about the gummy bears in each situation?
Why did group A win the fish competition?
Review
Watch this video to view the molecule movements in osmosis and diffusion (and dialysis but that is not today's topic!)
Discussion
What did you observe about the gummy bears in each situation?
Why did group A win the fish competition?
Review
Watch this video to view the molecule movements in osmosis and diffusion (and dialysis but that is not today's topic!)
Activity 3: EXPERT LEVEL!
In this activity, created by Ms. Isernhagen, you will explore the concept of chromatography in spinach.
You probably know that there is chlorophyll in plants -- the green pigment that gives plants their colour and also is fundamental to photosynthesis (the ability to take sunlight and create sugars by the plant).
But did you know that there is more than one type of chlorophyll? You can separate these using their densities using chromatography which is the separation of a mixture by passing it in solution or suspension or as a vapor (as in gas chromatography) through a medium in which the components move at different rates. In this lab, you can try chromatography at home!
I have put a video below to help you!
Click on the file below to try this procedure, entitled "Hidden Colours."
You will need:
- spinach leafs (baby spinach or other leaves work great)
- rubbing alcohol
- coffee filter
- tall glass or vase to use as a chromatography chamber
- ruler
- coin
| hidden_colours.pdf | |
| File Size: | 131 kb |
| File Type: | |
Week 4: April 27 - May 1
This week, we are doing some interesting activities related to DNA and genetics. As you recall, a gene is a piece of DNA code that relates to a particular trait. There are two forms of traits: dominant and recessive. We call these alleles and they represent getting one copy from your mom and one from your dad.
In our Zoom classes this week, we will be learning about different personal traits so be prepared to answer some questions about what traits you have or don't have! Also, we'll review Punnett Squares so you can understand how your traits are inherited!
Instead of a Kahoot, we'll build a virtual monster together using dominant and recessive alleles for various traits.
Zoom link for Wednesday HERE
Zoom link for Friday HERE
The Doodle Poll is live right now: CLICK HERE
Activity 1: Watch this Video and prepare for class this week for our virtual lab together
This video from TedEd gives us a good idea about the inheritance of genes from our ancestors, and introduces Gregor Mendel, an Austrian monk, who discovered the properties of inheritance in his pea plants.
Before class this week where we will make a monster together, be able to answer the following questions. Google the answers!
1. What is a trait?
2. What are genes? How are they related to traits?
3. How are gene pairs written out?
4. What is a genotype?
5. What are dominant and recessive alleles? How are they written out?
6. What is a phenotype?
By popular demand (after class on Wednesday): Build your own Monster: Link HERE
Activity 2: Review what is DNA and where is it in our cells?
This video is a refresher on what DNA is and how it is made up.
I have two interactive activities for building a DNA model using the nucleotides A, T, C, and G.
This one is not timed and lets you practice with ease.
This one is a retro video game style that is a race! How many base pairs can you match? It's hard!! Go through the first few instructions in order to get to the game.
Activity 3: Extract DNA from food at home!
Background
Recall that all living things are made of cells, and each cell contains a molecule called DNA. DNA carries the genetic information that determines gender, physical appearance, vulnerability toward disease, and many other parts of who we are. Every cell in our body contains DNA. Even though cells can only be seen under a microscope, an uncoiled piece of DNA can be 2.8 inches (7.2 centimeters) long!
Getting at the DNA
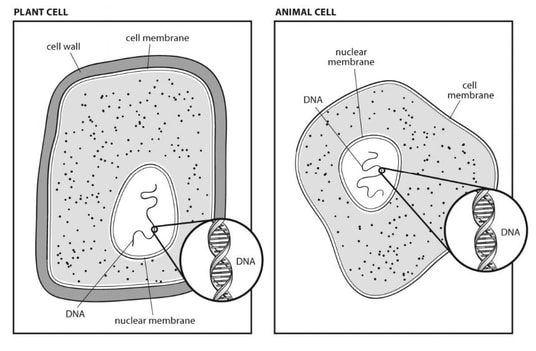
Plant and animal cells store their DNA in the nucleus, a small compartment inside each cell that is surrounded and protected by the nuclear membrane (see the figure to the right). A membrane is a flexible, thin layer made of phospholipids and few molecules including water can pass through. The cell membrane surrounds and protects the entire cell. Adding detergent or soap breaks the nuclear and cell membranes because remember soap breaks down lipids (fats) which is why you use it on greasy dishes. Phospholipids are a type of lipid. Remember, plant cells, but not animal cells, also have a rigid cell wall around the outside of the cell. You must smash the banana in the bag or blend the split peas (depending on which lab below you choose to do) to break the cell walls and expose the membranes inside to the soap or detergent. Once the DNA has been released, the meat tenderizer (or pineapple juice or contact lens solution) helps untangle and unfold the DNA from the other parts of the cell.
Protecting the DNA
To prevent viruses and bacteria from invading the cell with their DNA, cells have enzymes (called DNase enzymes) that chop up any DNA floating around outside the nucleus. Once the banana or pea DNA is out of the nucleus, it becomes vulnerable to these enzymes. You use cold ingredients to protect the DNA from DNases. Since reactions are slower at lower temperatures, using cold alcohol and other cold ingredients slows down the DNase reactions that break down DNA. Meat tenderizer is also important. Meat tenderizer contains another two enzymes, bromelain and papain, which are extracted from pineapples and papayas, respectively. Enzymes break down proteins so that painful feeling in your mouth after eating pineapples is the bromelain eating at your mouth tissue! When DNA is packaged in the nucleus, it is wound tightly around proteins. Bromelain and papain enzymes break down these proteins and release the DNA with minimal breakage.
Separating Out the DNA
DNA is soluble in water, but not in salty water. All the other cell contents are soluble in water and salt water. This difference in solubility allows you to separate DNA from the rest of the cell. You add salt to the mixture to force the DNA out of the solution of water, food, and soap. DNA is not soluble in alcohol. When the DNA leaves the salty water mixture, it comes into contact with the alcohol and cannot dissolve. When DNA comes in contact with alcohol, it uncoils and precipitates (turns into a solid that forms from a liquid solution). All the other cell contents stay in the salty water solution.
There are two sets of instructions for this depending on what materials you have at home.
Version 1: Extracting DNA from anything living! Dr. Ausman's Preferred Protocol
Here's the instructions: CLICK HERE
I will use the green split peas in the instructions but you can use any other genetic (living) material (banana, strawberry, spinach)
Click HERE for video with instructions, step by step, or see below for my homemade Youtube video.
Materials required: food source, table salt, cold water, blender, strainer, liquid dish soap, measuring cups, small glasses or jars, meat tenderizer (alternates: pineapple juice, contact lens solution), kebab skewer or toothpick, isopropyl (rubbing alcohol 70-90%) -- must be put in the freezer ahead of time for an hour or more
Version 2: Extract DNA from a Banana (instructions from Ministry in Quebec)
I have not tried this set of instructions as I always use the one above and it works.
Mr. Campbell's video with this procedure is here and it works really well!
Ministry instructions:
- Put half a banana in a resealable bag (with a zipper at the top) and mash the banana.
- Pour half a cup of hot water and a teaspoon of salt into the bag. Mix well.
- Add a teaspoon of dish soap to the bag and gently mix (to avoid making bubbles).
- Pour the mixture through a coffee filter and into a tall and narrow glass. Wait for the mixture to pass through the filter.
- Pour some isopropyl alcohol slowly into the glass until it forms a layer that is two (2) centimeter thick above the banana mixture. Do not mix. Wait while the DNA floats up into the alcohol.
Week 3: April 20-24
Hi folks! The Ministry sent us some inspiration to look at aspects of air pressure and respiration, so I have a number of ways of entering this topic. As always, our classes will be Wednesday and Friday (either one, optional) at 10am.
The Zoom links: Click here for Wednesday; and click here for Friday
The Doodle Poll to indicate which day you will attend: CLICK HERE.
Also please check out the new tab at the top for ongoing projects! These are multi-week projects we can do. I'll keep adding to this list as well.
The projects include (so far):
1) Rube Goldberg Machine
2) Growing your own food from kitchen scraps in water
3) Cooking/Baking Challenge: make something tasty and show your delicious creation in class!
This week's respiration/air pressure activities include:
Activity 1: Respiratory System Crossword
For this activity, you can use google slides or print and fill in the crossword on the respiratory system
There's a great helper on the major structures here.
1) PDF Version (Printing): here
2) Google Slides Version here -- you must "save a copy" in order to edit. Pro tip: click on View and then zoom in to a higher resolution so that you can fill in letters
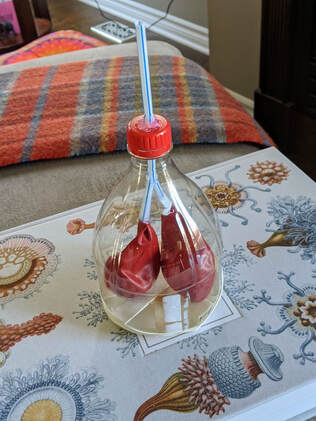
Activity 2: Build your own Lung in a Bottle
I have made a helpful video to show you how this is done. It really works if you do it well! I am not the best at constructing them but it does work! Pro tip: get a very rigid bottle, or a smaller one (500mL instead of 2L pop bottle and do one lung not two). But I leave it to you to check out!
Here is the video I made.
Also there are many ways to do this on YouTube so check it out!
Materials:
Straws (2)
Balloons (3 or 4 ...one for backup)
Scissors
Hot glue or electrical tape
Bottle (firm -- glass or firm plastic)
Sharpie
Exacto knife/Box cutter
Optional: Drill
Questions:
1) How did your build go?
2) What happens when you pull gently on the diaphragm (balloon at the bottom)?
3) How does this model relate to the way air moves into and out of the human lung? What do you think might happen if you had a hole in your diaphragm?
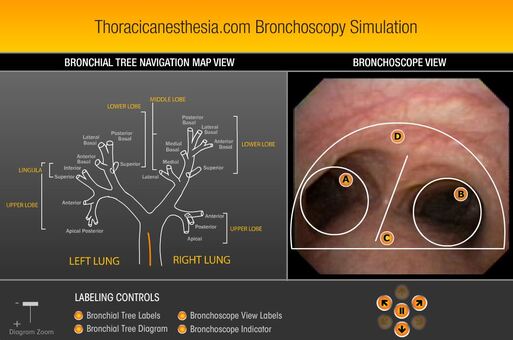
Activity 3: Conduct a Virtual Bronchoscopy
Enter the lung and take a tour!
Instructions:
1) Click here to go to the main page
2) Click on the simulator picture (you might need to run flash but just choose yes).
3) Use the arrows in the simulator to travel through the lungs. Remember the diagram is inverted! The lungs branch downward into the chest cavity. In the diagram you're travelling "upward" like a tree but this is because the journey involves putting a scope down the trachea into the lungs so the diagram represents this journey. You can see where you are going on the map of the lungs shown on the left. Is this what you thought the lungs would look like for real?
Week 2: April 13-17
Physical and Chemical Changes Review!
This week, there are different challenges that take us back to physical and chemical changes plus optional activities based on what you suggested in our classes this week. Thank you to everybody for participating. We had almost fifty students attend in grade 9 science this week! Remember that all learning is optional and I invite you to participate in these activities and in the Zoom meetings. Links to the meetings for April 15 and 17 at 10am will be posted here next week.
Participate in the doodle poll and choose one day to attend class.
ZOOM LINKS: Wednesday 10am click here and Friday 10am click here
Activity 1: Digital Escape Room -- "The Lost Isle of Change"
You and your classmates have been mysteriously shipwrecked on the Lost Isle of Change. On your initial search of the island you discovered 7 hexagonal shaped stone tablets that you believe will help you signal passing ships and get rescued from the island.
Use your cunning thinking skills and knowledge of chemical and physical changes to decipher each stone tablet and unlock its hidden code. Work fast! You do not have much time before the last ship passes the island and all hope for rescue will be lost. Good luck!
1) Go to this website to see the escape room
2) Hints: There are several symbols on the right side of the page. Each one has a different lock combination.
Nest Tablet -- 8 letter word lock
Chisel Tablet - 5 digit lock
Vine Tablet - Directional Lock (U D L R for up, down, left, right)
Hiking Boot Tablet - 7 symbol lock
Axe Tablet - Word lock
Pine Tree Tablet - Color Lock (use first letters of colors)
Fire Tablet - P/C lock (P for physical and C for chemical)
Good luck! I look forward to hearing about whether you broke out!
Note: You don't have to do the reflection if the website sends you a link for that. It is best done in class.
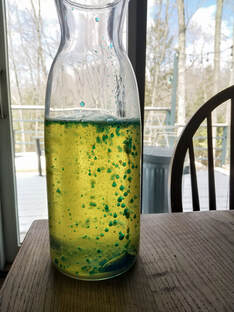
Activity 2: Build your own Lava Lamp
1) Materials: vegetable oil (canola), vinegar, food coloring (or use dark vinegar like balsamic if you don't have food coloring), baking soda (sodium bicarbonate), tall glass/vase/bottle, spoon, small cup.
2) Instructions:
- Add three spoons of baking soda to the tall glass or bottle
- fill two thirds of the container with oil but don't mix or stir!
- in the small cup, add some vinegar and several drops of food coloring (or use dark vinegar if no food coloring)
- slowly add drops of your colored vinegar into your oil/baking soda mix and watch your lava lamp come to life.
3) Hints: you can use different colors (make two small cups of vinegar); also add a bit at a time; and also wait!
4) Take a picture or video of your lava lamp and send it to me!
Questions for discussion:
1) What properties of density enable this lava lamp to work?
2) What kind of reaction (physical/chemical) is happening and between what substances?
Student Submissions:
Rebecca L: VIDEO
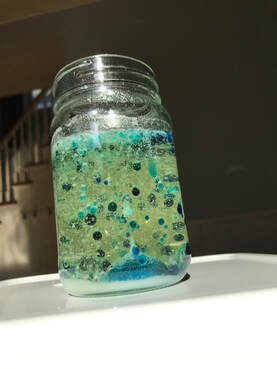
Robbie F: (Photo): --> see the image on the right
Gavin AM: VIDEO
Henry F: (see below)
Week 1: April 6-10
Hello Grade 9!
I miss you very much! It would be so great to see one another once again, so I am thinking we can do a simple activity together and reconnect at least to see each other and say hello. This activity will be something we can all do at home. We are going to use our brains to think about objects in space. As well, I will search for some great activities related to biology too for next week, since that is the unit we were in when school was let out.
I would like us to meet on Zoom (it is a meeting platform where we can all log in at once and see each other). There are two optional meeting times: Wednesday April 8th at 10am or Friday April 10th at 10am. Here is a doodle poll for you to click and sign up for which one you are available for (or both).
Instructions:
1) Go to the website: https://www.foldnfly.com/#/1-1-1-1-1-1-1-1-2
2) Choose one easy and one medium or hard paper airplane to create. Work on your creations over the next week. You can record a video of them flying and send it to me (Dropping it in Google drive and sending me a link is the best or making a Youtube video and sending me the link also works amazingly. My email address is [email protected]).
3) Log in on one of the zoom days. Prepare a short explanation for why you chose this airplane design, what your priorities were (acrobatic, the look, the distance, time aloft) and why one form worked better than the other in your opinion. How long did your plane stay aloft? (Time it using a stopwatch or on your phone.) What would you change about your process? What challenges did you face?
Wednesday class click here to join at 10am
Friday class click here to join at 10am
I am hoping some students would like to meet up!
Let's see how this goes! I hope you are all staying safe and please wash your hands a lot!
Dr. Ausman
Videos
Gavin A: Click here
Cameron M: Travelled 21.5m -- click here
Savannah H: Click here
Rebecca L:
2.09 seconds - Origami Plane - Video
3.53 seconds - Tailed Plane - Video
2.90 seconds - Zip Dart - Video
3.36 seconds - Hunting Flight - Video
3.15 seconds - Fast Hawk - Video
3.2o seconds - The Buzz - Video
2.09 seconds - Origami Plane - Video
3.53 seconds - Tailed Plane - Video
2.90 seconds - Zip Dart - Video
3.36 seconds - Hunting Flight - Video
3.15 seconds - Fast Hawk - Video
3.2o seconds - The Buzz - Video
Saralie D: Click here
